|
|
定义:c++提供了函数模板(function template)。所谓函数模板,实际上是建立一个通用函数,其函数类型和形参类型不具体制定,用一个虚拟的类型来代表。这个通用函数就成为函数模板。
目的:能够让程序员编写与类型无关的代码。比如编写了一个交换两个整型int 类型的swap函数,这个函数就只能实现int 型,对double,字符这些类型无法实现,要实现这些类型的交换就要重新编写另一个swap函数。使用模板的目的就是要让这程序的实现与类型无关,比如一个swap模板函数,即可以实现int 型,又可以实现double型的交换。
细节:
- 模板是一种对类型进行参数化的工具
- 通常有两种形式:函数模板和类模板
- 函数模板针对仅参数类型不同的函数
- 类模板针对仅数据成员和成员函数类型不同的类
注意:模板的声明或定义只能在全局,命名空间或类范围内进行。即不能在局部范围,函数内进行,比如不能在main函数中声明或定义一个模板。
1、函数模板规则
template <typename 形参名,typename 形参名,......>
返回类型 函数名(参数列表)
{
函数体
}
其中template和class是关键字,typename 可以用class关见字代替,在这里typename 和class没区别,<>括号中的参数叫模板形参,模板形参和函数形参很相像,模板形参不能为空。一但声明了模板函数就可以用模板函数的形参名声明类中的成员变量和成员函数,即可以在该函数中使用内置类型的地方都可以使用模板形参名。模板形参需要调用该模板函数时提供的模板实参来初始化模板形参,一旦编译器确定了实际的模板实参类型就称他实例化了函数模板的一个实例。比如swap的模板函数形式为
template <class T> void swap(T& a, T& b){},
当调用这样的模板函数时类型T就会被被调用时的类型所代替,比如swap(a,b)其中a和b是int 型,这时模板函数swap中的形参T就会被int 所代替,模板函数就变为swap(int &a, int &b)。而当swap(c,d)其中c和d是double类型时,模板函数会被替换为swap(double &a, double &b),这样就实现了函数的实现与类型无关的代码。可见案例1的函数模板。
2、函数模板实例和注意事项
1 函数模板
- 泛型编程 – 模板技术 特点:类型参数化
- template< typename T > 告诉编译器后面紧跟着的函数或者类中出现T,不要报错,T是一个通用的数据类型
- 实现通用两个数进行交换函数
- 使用
- 自动类型推导(个人觉得可以称为隐式类型推导) 必须要推导出一致的T才可以使用,否则报错
- 显示指定类型 mySwap(a,b);
void mySwapInt(int& a, int& b)
{
int temp = a;
a = b;
b = temp;
}
void mySwapDouble(double& a, double& b)
{
double temp = a;
a = b;
b = temp;
}
//利用模板实现通用交换函数
template<typename T> //T代表一个通用的数据类型,告诉编译器如果下面紧跟着的函数或者类中出现T不要报错
void mySwap(T& a, T& b) //模板不能单独使用,必须指定出T才可以使用
{
T temp = a;
a = b;
b = temp;
}
void test01()
{
int a = 10;
int b = 20;
char c1 = &#39;c&#39;;
//1、自动类型推导,必须推导出一致的T数据类型,才可以正常的使用模板
//mySwap(a, c1); //报错:推导不出一致的T,因此无法调用
//mySwap(a, b); //等同于mySwapInt(a, b);
double c = 3.14;
double d = 1.1;
mySwap(c, d); // 等同于mySwapDouble(c, d);
cout << c << endl;
cout << d << endl;
//2、显示指定类型
mySwap<int>(a, b);
cout << a << endl;
cout << b << endl;
}
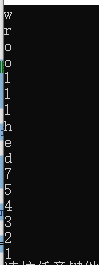
2 实现对char、 int类型数组进行排序
利用模板技术 实现对char、int类型数组通用排序函数
template <class T>
void mySwap(T& a, T& b)
{
T temp = a;
a = b;
b = temp;
}
//需求 通过一个通用排序函数 实现对char和int数组的排序,选择排序算法从大到小
template< class T > // typename 和 class 一样
void mySort(T arr[], int len)
{
for (int i = 0; i < len; i++)
{
int max = i;
for (int j = i + 1; j < len; j++)
{
if (arr[max] < arr[j])
{
max = j;
}
}
//判断 算出的max和开始认定的i是否一致,如果不同交换数据
if (i != max)
{
mySwap(arr, arr[max]);
}
}
}
template<class T>
void printArray(T arr[], int len)
{
for (int i = 0; i < len; i++)
{
cout << arr << endl;
}
}
void test01()
{
char charArray[] = &#34;helloworld&#34;;
int len = strlen(charArray);
mySort(charArray, len);
printArray(charArray, len);
int intArray[] = { 5, 7, 1, 4, 2, 3 };
len = sizeof(intArray) / sizeof(int);
mySort(intArray, len);
printArray(intArray, len);
}
3 函数模板和普通函数比较
1 区别
- 自动类型推导 不可以发生隐式类型转换
- 普通函数 可以发生隐式类型转换
template<class T>
T myAdd(T a, T b)
{
return a + b;
}
int myAdd2(int a, int b)
{
return a + b;
}
void test01()
{
int a = 10;
int b = 20;
char c = &#39;c&#39;;
//myAdd(a, c); //如果使用自动类型推导,是不可以发生隐式类型转换的
cout << myAdd2(a, c) << endl; //普通函数 可以发生隐式类型转换
}
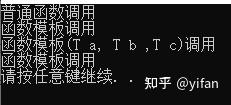
2 调用规则
- 如果函数模板和普通函数都可以调用,那么优先调用普通函数
- 如果想强制调用函数模板,可以使用空模板参数列表 myPrint<>(a, b);
- 函数模板也可以发生函数重载
- 如果函数模板能产生更好的匹配,那么优先使用函数模板
//2、函数模板和普通函数的调用规则
template<class T>
void myPrint(T a, T b)
{
cout << &#34;函数模板调用&#34; << endl;
}
template<class T>
void myPrint(T a, T b, T c)
{
cout << &#34;函数模板(T a, T b ,T c)调用&#34; << endl;
}
void myPrint(int a, int b)
{
cout << &#34;普通函数调用&#34; << endl;
}
void test02()
{
//1、如果函数模板和普通函数都可以调用,那么优先调用普通函数
int a = 10;
int b = 20;
myPrint(a, b);
//2、如果想强制调用函数模板,可以使用空模板参数列表
myPrint<>(a, b);
//3、函数模板也可以发生函数重载
myPrint(a, b, 10);
//4、如果函数模板能产生更好的匹配,那么优先使用函数模板
char c = &#39;c&#39;;
char d = &#39;d&#39;;
myPrint(c, d);
}
4 模板的实现机制
- 编译器并不是把函数模板处理成能够处理任何类型的函数
- 函数模板通过具体类型产生不同的函数 --- 通过函数模板产生的函数 称为模板函数
- 编译器会对函数模板进行两次编译,在声明的地方对模板代码本身进行编译,在调用的地方对参数替换后的代码进行编译。
template<class T>
void myPrint(T a, T b)
{
cout << &#34;函数模板调用&#34; << endl;
}
/*
函数模板通过具体类型产生不同的函数 --- 通过函数模板产生的函数 称为 模板函数
void myPrint(int a ,int b)
{
cout << &#34;函数模板调用&#34; << endl;
}
void myPrint(double a ,double b)
{
cout << &#34;函数模板调用&#34; << endl;
}
*/
5 模板局限性
- 模板并不是真实的通用,对于自定义数据类型,可以使用具体化技术,实现对自定义数据类型特殊使用
- template<> bool myCompare(Person &a, Person &b)
class Person
{
public:
Person(string name, int age)
{
this->m_Name = name;
this->m_Age = age;
}
string m_Name;
int m_Age;
};
//显示两个变量 对比 函数
template<class T>
bool myCompare(T& a, T& b)
{
if (a == b)
{
return true;
}
return false;
}
//利用具体化技术 实现对自定义数据类型 提供特殊模板--当然也可以考虑使用重载上面的等号实现
template<> bool myCompare(Person& a, Person& b)
{
if (a.m_Name == b.m_Name && a.m_Age == b.m_Age)
{
return true;
}
return false;
}
void test01()
{
Person p1(&#34;Tom&#34;, 19);
Person p2(&#34;Tom&#34;, 20);
bool ret = myCompare(p1, p2);
if (ret)
{
cout << &#34;p1 == p2&#34; << endl;
}
else
{
cout << &#34;p1 != p2&#34; << endl;
}
}
3、类模板规则
1 格式
template<class 形参名,class 形参名,…>
class 类名{ ... };
类模板和函数模板都是以template开始后接模板形参列表组成,模板形参不能为空,一但声明了类模板就可以用类模板的形参名声明类中的成员变量和成员函数,即可以在类中使用内置类型的地方都可以使用模板形参名来声明。比如
template<class T> class A{public: T a; T b; T function_(T c, T &d);};
在类A中声明了两个类型为T的成员变量a和b,还声明了一个返回类型为T带两个参数类型为T的函数function_。
2 类模板对象的创建
比如一个模板类A,则使用类模板创建对象的方法为A<int> m;在类A后面跟上一个<>尖括号并在里面填上相应的类型,这样的话类A中凡是用到模板形参的地方都会被int 所代替。当类模板有两个模板形参时创建对象的方法为A<int, double> m;类型之间用逗号隔开。
3 在类模板外部定义成员函数的方法为
比如有两个模板形参T1,T2的类A中含有一个void h()函数,则定义该函数的语法为:
template<class T1,class T2> void A<T1,T2>::h(){}
注意:当在类外面定义类的成员时template后面的模板形参应与要定义的类的模板形参一致。
4 类模板和函数模板区别
1、类模板不可以使用自动类型推导,只能用显示指定类型
2、类模板中 可以有默认参数
template<class NAMETYPE, class AGETYPE = int > //类模板中 可以有默认参数
class Person
{
public:
Person(NAMETYPE name, AGETYPE age)
{
this->m_Name = name;
this->m_Age = age;
}
void showPerson()
{
cout << &#34;姓名: &#34; << this->m_Name << &#34; 年龄: &#34; << this->m_Age << endl;
}
NAMETYPE m_Name;
AGETYPE m_Age;
};
void test01()
{
//类模板和函数模板区别:
//Person p1(&#34;孙悟空&#34;, 100); //1、类模板不可以使用自动类型推导,只能用显示指定类型
Person<string > p1(&#34;孙悟空&#34;, 100); //2、类模板中 可以有默认参数
p1.showPerson();
}
5 注意
1)对于类模板,模板形参的类型必须在类名后的尖括号中明确指定。比如A<2> m;用这种方法把模板形参设置为int是错误的(编译错误:error C2079: &#39;a&#39; uses undefined class &#39;A<int>&#39;),类模板形参不存在实参推演的问题。也就是说不能把整型值2推演为int 型传递给模板形参。要把类模板形参调置为int 型必须这样指定A<int> m。
2)模板的声明或定义只能在全局,命名空间或类范围内进行。即不能在局部范围,函数内进行,比如不能在main函数中声明或定义一个模板。
4、类模板实例和注意事项
1 类模板中成员函数创建时机
类模板中的成员函数 并不是一开始创建的,而是在运行阶段确定出T的数据类型才去创建
class Person1
{
public:
void showPerson1()
{
cout << &#34;Person1 show 调用&#34; << endl;
}
};
class Person2
{
public:
void showPerson2()
{
cout << &#34;Person2 show 调用&#34; << endl;
}
};
//类模板中的成员函数 并不是一开始创建的,而是在运行阶段确定出T的数据类型才去创建
template<class T>
class MyClass
{
public:
void func1()
{
obj.showPerson1();
}
void func2()
{
obj.showPerson2();
}
T obj;
};
void test01()
{
MyClass <Person2> p1;
//p1.func1();
p1.func2();
}
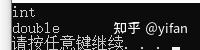
2 类模板做函数参数
- 指定传入类型 void doWork(Person <string, int>&p) ---这种方式使用居多
- 参数模板化
- template<class T1, class T2>
- void doWork2(Person <T1, T2>&p)
- 整个类 模板化
- template
- void doWork3( T &p)
查看T数据类型:typeid(T).name()
template<class T1, class T2> //类模板中 可以有默认参数
class Person
{
public:
Person(T1 name, T2 age)
{
this->m_Name = name;
this->m_Age = age;
}
void showPerson()
{
cout << &#34;姓名: &#34; << this->m_Name << &#34; 年龄: &#34; << this->m_Age << endl;
}
T1 m_Name;
T2 m_Age;
};
//1、指定传入类型
void doWork(Person <string, int>& p)
{
p.showPerson();
}
void test01()
{
Person <string, int>p(&#34;孙悟空&#34;, 999);
doWork(p);
}
//2、参数模板化
template<class T1, class T2>
void doWork2(Person <T1, T2>& p)
{
cout << &#34;T1数据类型: &#34; << typeid(T1).name() << endl;
cout << &#34;T2数据类型: &#34; << typeid(T2).name() << endl;
p.showPerson();
}
void test02()
{
Person<string, int>p(&#34;猪八戒&#34;, 998);
doWork2(p);
}
//3、整个类 模板化
template<class T>
void doWork3(T& p)
{
cout << &#34;T的数据类型: &#34; << typeid(T).name() << endl;
p.showPerson();
}
void test03()
{
Person<string, int>p(&#34;唐僧&#34;, 100);
doWork3(p);
}

3 类模板碰到继承的问题以及解决
必须要指定出父类中的T数据类型,才能给子类分配内存
template<class T>
class Base2
{
public:
T m_A;
};
//必须要指定出父类中的T数据类型(下面的T2,由后面定义对象时传入),才能给子类分配内存,T1的作用是给m_B指定数据类型用的。
template<class T1, class T2>
class Son2 :public Base2<T2>
{
public:
Son2()
{
cout << typeid(T1).name() << endl;
cout << typeid(T2).name() << endl;
}
T1 m_B;
};
4 类模板中的成员函数类外实现
void Person<T1, T2>::showPerson()
template<class T1, class T2>
class Person
{
public:
Person(T1 name, T2 age);
//{
// this->m_Name = name;
// this->m_Age = age;
//}
void showPerson();
//{
// cout << &#34;姓名: &#34; << this->m_Name << &#34; 年龄:&#34; << this->m_Age << endl;
//}
T1 m_Name;
T2 m_Age;
};
template<class T1, class T2>
Person<T1, T2>::Person(T1 name, T2 age)
{
this->m_Name = name;
this->m_Age = age;
}
template<class T1, class T2>
void Person<T1, T2>::showPerson()
{
cout << &#34;姓名: &#34; << this->m_Name << &#34; 年龄:&#34; << this->m_Age << endl;
}
void test01()
{
Person <string, int>p(&#34;Tom&#34;, 10);
p.showPerson();
}
5 类模板的分文件编写问题以及解决
类模板中的成员函数,不会一开始创建,因此导致分文件编写时连接不到函数的实现,出现无法解析的外部命令错误
- 解决方式1:直接包含.cpp文件 (不推荐)
- 解决方式2:将类声明和实现写到同一个文件中,将文件的后缀名改为 .hpp 即可。.hpp(这个是个约定的规则,并不是标准必须这么写).
原因:
- 类模板需要二次编译,在出现模板的地方编译一次,在调用模板的地方再次编译。
- C++编译规则为独立编译。
6 类模板碰到友元的问题以及解决
- 友元类内实现 friend void printPerson(Person<T1, T2> &p)
- 友元类外实现 分为先声明和实现形式,也可以申明和实现写一起。
template<class T1, class T2>
class Person;
template<class T1, class T2>
void printPerson2(Person<T1, T2>& p);
template<class T1, class T2> //这种申明和实现写一起
void printPerson3(Person<T1, T2>& p)
{
cout << &#34;类外实现 --- 姓名: &#34; << p.m_Name << &#34; 年龄: &#34; << p.m_Age << endl;
}
//以上都是为了2实现使用到的
template<class T1, class T2> // 修饰了Person(T1 name, T2 age) printPerson2<> printPerson3<>
class Person
{
//1、友元函数 类内实现 注意:这个是普通函数
friend void printPerson(Person<T1, T2>& p)
{
cout << &#34;姓名: &#34; << p.m_Name << &#34; 年龄: &#34; << p.m_Age << endl;
}
//2、友元函数 类外实现 注意:下面的不是普通函数,因为带了<>,因此是一个函数模板
friend void printPerson2<>(Person<T1, T2>& p);
friend void printPerson3<>(Person<T1, T2>& p);
public:
Person(T1 name, T2 age)
{
this->m_Name = name;
this->m_Age = age;
}
private:
T1 m_Name;
T2 m_Age;
};
template<class T1, class T2>
void printPerson2(Person<T1, T2>& p)
{
cout << &#34;类外实现 --- 姓名: &#34; << p.m_Name << &#34; 年龄: &#34; << p.m_Age << endl;
}
void test01()
{
Person <string, int> p(&#34;Tom&#34;, 100);
printPerson(p);
printPerson2(p);
printPerson3(p);
}
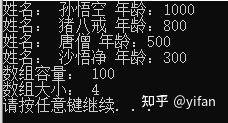
7 类模板应用 – 数组类封装
- 将类写到 myArray.hpp中
- 属性:
- T * pAddress; 指向堆区数组指针
- int m_Capacity 数组容量
- int m_Size ;数组大小
- 行为
- myArray(int capacity)
- myArray(const MyArray & arr)
- operator=
- operator[]
- ~myArray()
- getCapacity
- getSize
- pushback
myArray.hpp
#pragma once
#define _CRT_SECURE_NO_WARNINGS
#include<iostream>
using namespace std;
template<class T>
class MyArray
{
public:
MyArray(){};
//有参构造
MyArray(int capacity)
{
this->m_Capacity = capacity;
this->m_Size = 0;
this->pAddress = new T[this->m_Capacity];
}
//拷贝构造
MyArray(const MyArray& arr)
{
this->m_Capacity = arr.m_Capacity;
this->m_Size = arr.m_Size;
this->pAddress = new T[this->m_Capacity];
for (int i = 0; i < arr.m_Size; i++)
{
this->pAddress = arr.pAddress;
}
}
//重载=
MyArray& operator=(const MyArray& arr)
{
if (this->pAddress)
{
delete[] this->pAddress;
this->pAddress = NULL;
}
this->m_Capacity = arr.m_Capacity;
this->m_Size = arr.m_Size;
this->pAddress = new T[this->m_Capacity];
for (int i = 0; i < arr.m_Size; i++)
{
this->pAddress = arr.pAddress;
}
return *this;
}
//重载[]
T& operator[] (int index)
{
return this->pAddress[index];
}
//尾插法
void pushBack(const T& val)
{
if (this->m_Capacity == this->m_Size)
{
return;
}
this->pAddress[this->m_Size] = val;
this->m_Size++;
}
//获取数组容量
int getCapacity()
{
return this->m_Capacity;
}
//获取数组大小
int getSize()
{
return this->m_Size;
}
//析构
~MyArray()
{
if (this->pAddress)
{
delete[] this->pAddress;
this->pAddress = NULL;
}
}
private:
T* pAddress; //指向堆区真实数组指针
int m_Capacity; //数组容量
int m_Size; //数组大小
};
myArrayTest.cpp
#pragma once
#define _CRT_SECURE_NO_WARNINGS
#include<iostream>
using namespace std;
template<class T>
class MyArray
{
public:
MyArray(){};
//有参构造
MyArray(int capacity)
{
this->m_Capacity = capacity;
this->m_Size = 0;
this->pAddress = new T[this->m_Capacity];
}
//拷贝构造
MyArray(const MyArray& arr)
{
this->m_Capacity = arr.m_Capacity;
this->m_Size = arr.m_Size;
this->pAddress = new T[this->m_Capacity];
for (int i = 0; i < arr.m_Size; i++)
{
this->pAddress = arr.pAddress;
}
}
//重载=
MyArray& operator=(const MyArray& arr)
{
if (this->pAddress)
{
delete[] this->pAddress;
this->pAddress = NULL;
}
this->m_Capacity = arr.m_Capacity;
this->m_Size = arr.m_Size;
this->pAddress = new T[this->m_Capacity];
for (int i = 0; i < arr.m_Size; i++)
{
this->pAddress = arr.pAddress;
}
return *this;
}
//重载[]
T& operator[] (int index)
{
return this->pAddress[index];
}
//尾插法
void pushBack(const T& val)
{
if (this->m_Capacity == this->m_Size)
{
return;
}
this->pAddress[this->m_Size] = val;
this->m_Size++;
}
//获取数组容量
int getCapacity()
{
return this->m_Capacity;
}
//获取数组大小
int getSize()
{
return this->m_Size;
}
//析构
~MyArray()
{
if (this->pAddress)
{
delete[] this->pAddress;
this->pAddress = NULL;
}
}
private:
T* pAddress; //指向堆区真实数组指针
int m_Capacity; //数组容量
int m_Size; //数组大小
};
test.cpp
//测试代码:
class Person{
public:
Person(){}
Person(string name, int age){
this->mName = name;
this->mAge = age;
}
public:
string mName;
int mAge;
};
void PrintMyArrayInt(MyArray<int>& arr){
for (int i = 0; i < arr.getSize(); i++){
cout << arr << &#34; &#34;;
}
cout << endl;
}
void PrintMyPerson(MyArray<Person>& personArr)
{
for (int i = 0; i < personArr.getSize(); i++){
cout << &#34;姓名:&#34; << personArr.mName << &#34; 年龄: &#34; << personArr.mAge << endl;
}
}
MyArray<int> myArrayInt(10);
for (int i = 0; i < 9; i++)
{
myArrayInt.Push_back(i);
}
myArrayInt.Push_back(100);
PrintMyArrayInt(myArrayInt);
MyArray<Person> myArrayPerson(10);
Person p1(&#34;孙悟空&#34;, 1000);
Person p2(&#34;猪八戒&#34;, 800);
Person p3(&#34;唐僧&#34;,500);
Person p4(&#34;沙悟净&#34;, 300);
myArrayPerson.Push_back(p1);
myArrayPerson.Push_back(p2);
myArrayPerson.Push_back(p3);
myArrayPerson.Push_back(p4);
相关链接
若觉得有用,欢迎 点赞/收藏 ~~~ |
|


 发表于 2022-11-27 03:08:32
