|
|
1 训练营课程
(1)本节课主要学习智慧安防实战训练营的课程:https://mp.weixin.qq.com/s/3WrTMItNAGt8l2kjjf042w。

2. 学习目的
基于车辆检测+AI安全+分类模型的模式,将攻击与防御注入到检测任务与分类任务的级联点中,完成AI项目的对抗攻防安全功能。
3. 训练营作业
针对前面讲到的对抗样本监测模型与交通场景中存在的黑盒攻击风险,我们在此基础上优化对抗样本,并将车辆检测结果+对抗样本生成+对抗防御策略串联形成完善的AI安全功能。
对抗攻击链接:对抗攻击实现流程 https://blog.csdn.net/matlab_xiaogen/article/details/128209884?spm=1001.2014.3001.5502
对抗防御链接:对抗防御实现流程 https://blog.csdn.net/matlab_xiaogen/article/details/128210284?spm=1001.2014.3001.5502
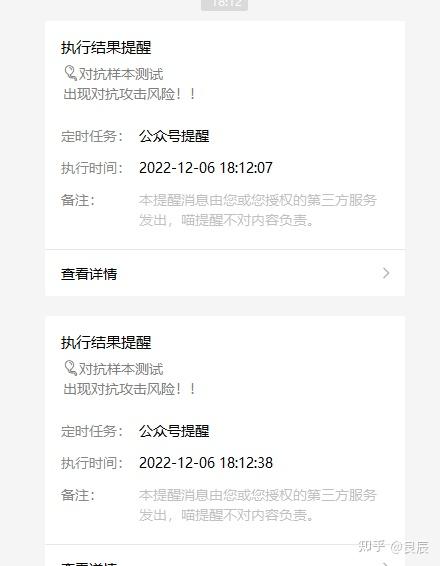
对抗攻击监测 + 喵提醒效果验证
项目主要流程:目标检测(yolov5)——>目标车辆特征提取——>对抗攻击模型——>喵提醒
对应下面代码流程:
代码实现:
from cvs import *
import time
import cv2
import torch
import requests
import aidlite_gpu
import torch.nn as nn
import torchvision.utils
import copy
import numpy as np
from detect_adv_code import Model, Detect_Model
from torchvision.models import mobilenet_v2, resnet18
from advertorch.utils import predict_from_logits
from advertorch_examples.utils import ImageNetClassNameLookup
from advertorch.utils import NormalizeByChannelMeanStd
from advertorch_examples.utils import bhwc2bchw
from advertorch_examples.utils import bchw2bhwc
from advertorch.attacks import FGSM, LinfPGDAttack
from yolov5_code.aidlux.utils import detect_postprocess, preprocess_img, draw_detect_res, extract_detect_res
device = "cuda" if torch.cuda.is_available() else "cpu"
normalize = NormalizeByChannelMeanStd(
mean=[0.485, 0.456, 0.406], std=[0.229, 0.224, 0.225])
imagenet_label2classname = ImageNetClassNameLookup()
### 对抗攻击常规模型加载
model = mobilenet_v2(pretrained=False)
ckpt = torch.load("model/mobilenet_v2.pth", map_location= device)
model.load_state_dict(ckpt, strict= True)
del ckpt
model.eval()
model = nn.Sequential(normalize, model)
model = model.to(device)
### 对抗攻击替身模型加载
model_su = resnet18(pretrained=False)
ckpt_su = torch.load("model/resnet18.pth", map_location= device)
model_su.load_state_dict(ckpt_su, strict= True)
del ckpt_su
model_su.eval()
model_su = nn.Sequential(normalize, model_su)
model_su = model_su.to(device)
def PGDAttack(model, model_su, img_np):
"""
args:
model-常规模型
model_su-替身模型
img_np - 原始图片
returns:
advimg - 增加对抗攻击后的图片
"""
np_img = img_np[:,:,::-1] / 255.0
img = torch.tensor(bhwc2bchw(np_img))[None, :, :, :].float().to(device)
imagenet_label2classname = ImageNetClassNameLookup()
### 测试模型输出结果
pred = imagenet_label2classname(predict_from_logits(model(img)))
print("test output:", pred)
### 输出原label
pred_label = predict_from_logits(model_su(img))
### 对抗攻击:PGD攻击算法
# adversary = LinfPGDAttack(
# model_su, eps=8/255, eps_iter=2/255, nb_iter=80,
# rand_init=True, targeted=False)
## 开启FGSM攻击算法,即替身算法转变为攻击算法,并生成对应的攻击图片
adversary = FGSM(
model_su, eps=20/255, targeted=False)
advimg = adversary.perturb(img, pred_label)
# advimg = np.transpose(advimg.squeeze().numpy(), (1, 2, 0))
return advimg
def main(video_path, flag_attack):
# flag_attack = 1 ##是否对图片进行对抗攻击
model_det = Model().eval().to(device)
model_det_attack = Detect_Model().eval().to(device)
# AidLite初始化:调用AidLite进行AI模型的加载与推理,需导入aidlite
aidlite = aidlite_gpu.aidlite()
# Aidlite模型路径
model_path = 'yolov5_code/models/yolov5_car_best-fp16.tflite'
# 定义输入输出shape
in_shape = [1 * 640 * 640 * 3 * 4]
out_shape = [1 * 25200 * 6 * 4]
# 加载Aidlite检测模型:支持tflite, tnn, mnn, ms, nb格式的模型加载
aidlite.ANNModel(model_path, in_shape, out_shape, 4, 0)
# 读取视频进行推理
cap = cv2.VideoCapture("/home/Lesson5_code/adv_code/test_images/test.avi")
while(1):
# 获取图片
ret, frame = cap.read()
# 预处理
img = preprocess_img(frame, target_shape=(640, 640), div_num=255, means=None, stds=None)
# 数据转换:因为setTensor_Fp32()需要的是float32类型的数据,所以送入的input的数据需为float32,大多数的开发者都会忘记将图像的数据类型转换为float32
aidlite.setInput_Float32(img, 640, 640)
# 模型推理API
aidlite.invoke()
# 读取返回的结果
pred = aidlite.getOutput_Float32(0)
# 数据维度转换
pred = pred.reshape(1, 25200, 6)[0]
# 模型推理后处理
pred = detect_postprocess(pred, frame.shape, [640, 640, 3], conf_thres=0.25, iou_thres=0.45)
all_boxes = pred[0]
frame = frame.astype(np.uint8)
if len(all_boxes) > 0:
for box in all_boxes:
x, y, w, h = [int(t) for t in box[:4]]
cut_img = frame[y:(y+h), x:(x + w)]
# print("---", cut_img.shape)
if flag_attack == 1:
advimg = PGDAttack(model, model_su, cut_img)
print("+++++", advimg.shape)
else:
cut_img = copy.deepcopy(cut_img[:,:,::-1] / 255)
advimg = torch.tensor(bhwc2bchw(cut_img))[None, :, :, :].float().to(device)
### 无对抗攻击监测模型
# detect_pred = model_det(advimg)
### 对抗攻击监测
detect_pred = model_det_attack(advimg)
# img = torch.tensor(bhwc2bchw(np_img))[None, :, :, :].float().to(device)
print("****", detect_pred)
if detect_pred > 0.5:
id = 'tWjznv9'
# 填写喵提醒中,发送的消息,这里放上前面提到的图片外链
text = "出现对抗攻击风险!!"
print("++++", text)
ts = str(time.time()) # 时间戳
type = 'json' # 返回内容格式
request_url = "http://miaotixing.com/trigger?"
headers = {
'User-Agent': 'Mozilla/5.0 (Windows NT 10.0; Win64; x64) AppleWebKit/537.36 (KHTML, like Gecko) Chrome/87.0.4280.67 Safari/537.36 Edg/87.0.664.47'}
result = requests.post(request_url + "id=" + id + "&text=" + text + "&ts=" + ts + "&type=" + type,
headers=headers)
else:
pred = imagenet_label2classname(predict_from_logits(model(advimg)))
print(pred)
if cv2.waitKey(100) & 0xFF == ord('q'):
break
if __name__ == "__main__":
main("./test_images/video.mp4", 1)AidLux终端输出:
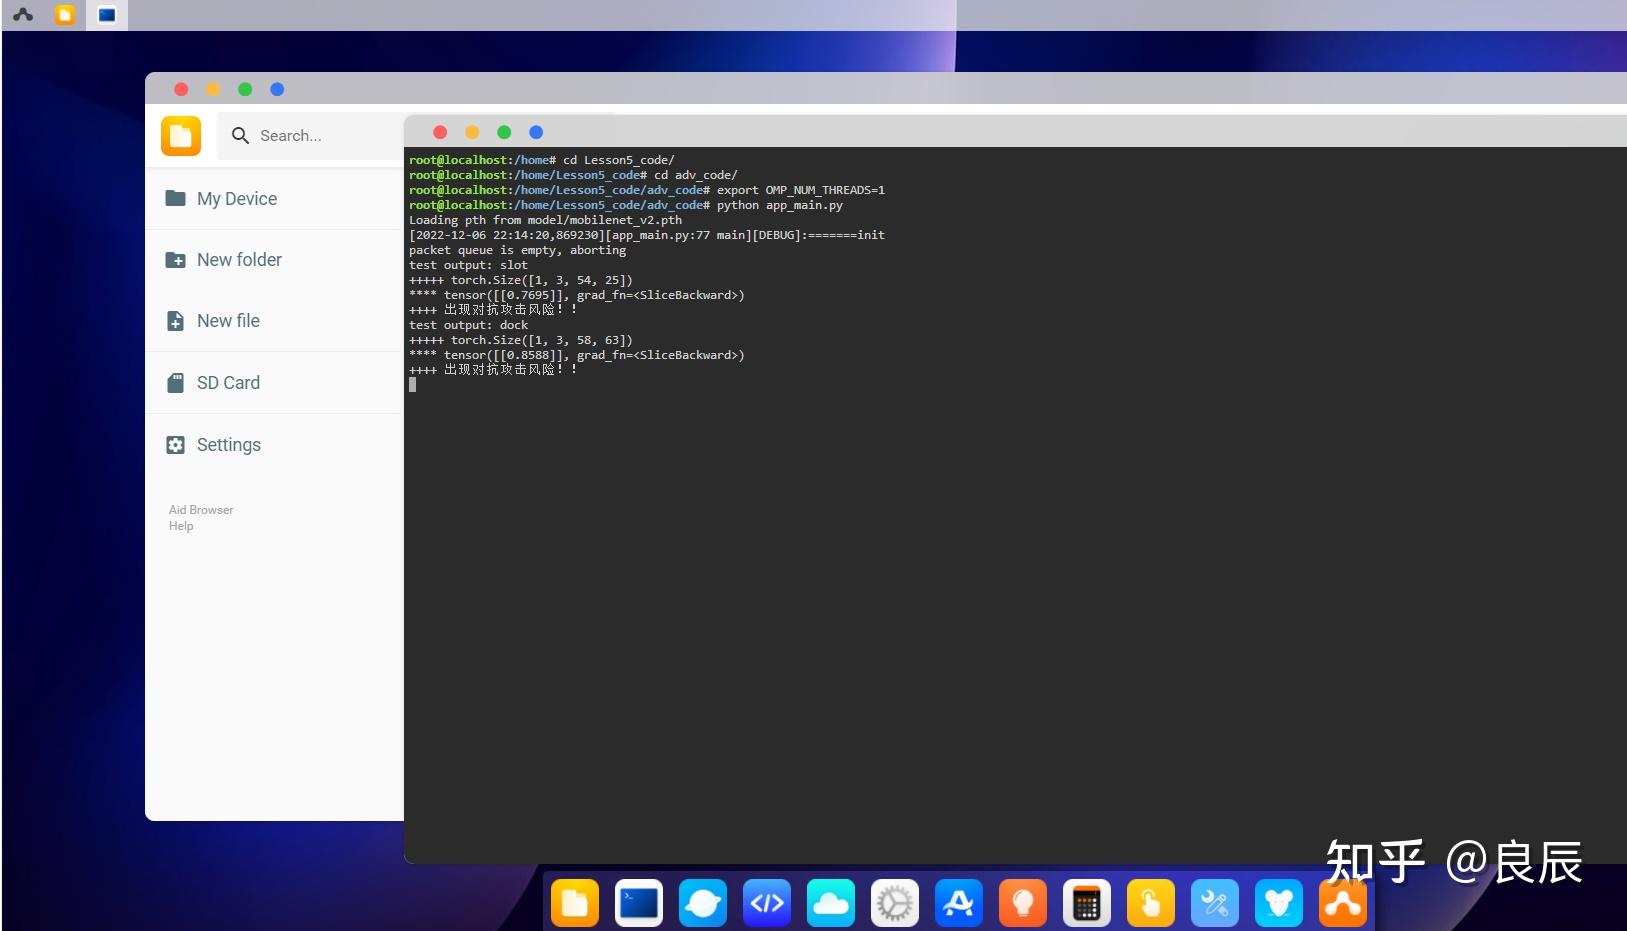
vscode终端输出:
+++++ torch.Size([1, 3, 54, 25])
**** tensor([[0.7695]], grad_fn=<SliceBackward>)
++++ 出现对抗攻击风险!!
test output: dock
+++++ torch.Size([1, 3, 58, 63])
**** tensor([[0.8588]], grad_fn=<SliceBackward>)
++++ 出现对抗攻击风险!!
test output: fire_engine
+++++ torch.Size([1, 3, 64, 61])
**** tensor([[0.6116]], grad_fn=<SliceBackward>)
++++ 出现对抗攻击风险!!
test output: convertible喵提醒:
学习心得:
AidLux智慧交通AI安全实战训练营,学习本次训练营对智慧交通中AI算法应用的安全及风险防御知识有了更多的认识,同时通过代码实践和在Aidlux端的部署实践,实现了车辆检测和安全风险防御预警。感谢此次训练营的培训Rocky老师、大白老师、aid助手用心指导。 |
|


 发表于 2023-1-16 07:57:03