|
|
若为获得最佳阅读体验请移步本文永久链接:
<hr/>开源的PHPMailer简洁易用,相对于PHP官方文档提供的mail()需要一个已安装且正在运行的邮件系统,才能使邮件函数可用,选择更强大易用的PHPMailer无疑一个更为明智的选择。
一、引言
最近在对一个停止维护的必应每日壁纸源码进行二次开发,在开发过程期间难免会有报错。为了避免每次报错的时候还需要去翻阅日志,就想到了用邮件把每天的自动抓取结果发送到自己的邮箱里。每次运行的结果都能及时的收到通知。本想PHPMailer的封装教程在网上已经不再罕见,去翻阅的时候却发现大部分的封装教程或多或少都有点过时了。索性我直接去翻阅了官方文档,按照官方的使用建议,去除了不必要的配置内容并进行了封装,也写下了比较符合现在PHPMailer的封装教程以供网友们查阅。
二、PHPMailer下载
PHPMailer的下载有两种方式,直接下载GitHub源代码或通过Composer安装。
这里我以Github源码下载方式以及163邮箱配置为例。
2.0 示例版本
今天是2022-09-18,我所使用的版本为PHPMailer 6.6.4
2.1 从 github 上下载
GitHub链接:https://github.com/PHPMailer/PHPMailer/
2.2 通过Composer安装
composer require phpmailer/phpmailer2.3 下载PHPMailer 6.6.4(可选)
为防止本文配置适用性降低,推荐大家下载与本文版本相同的6.6.4版本。 本文所用源码下载链接在文末给出。
2.4 所需文件
下载完成后的目录结构应为如下所示,我们只需要src目录下的Exception.php、PHPMailer.php、SMTP.php三个文件,并将它放入项目目录中。
PHPMailer
│
│ COMMITMENT
│ composer.json
│ darknetf.txt
│ get_oauth_token.php
│ LICENSE
│ README.md
│ SECURITY.md
│ VERSION
│
├─language
│ phpmailer.lang-zh.php
│ phpmailer.lang-zh_cn.php
│
└─src
Exception.php
OAuth.php
OAuthTokenProvider.php
PHPMailer.php
POP3.php
SMTP.php三、配置与使用
3.0 环境要求
注意,在使用之前,应检查PHP的openssl扩展与sockets扩展是否已开启。
3.1 官方示例
source.php
<?php
//Import PHPMailer classes into the global namespace
//These must be at the top of your script, not inside a function
use PHPMailer\PHPMailer\PHPMailer;
use PHPMailer\PHPMailer\SMTP;
use PHPMailer\PHPMailer\Exception;
//Load Composer&#39;s autoloader
require &#39;vendor/autoload.php&#39;;
//Create an instance; passing `true` enables exceptions
$mail = new PHPMailer(true);
try {
//Server settings
$mail->SMTPDebug = SMTP::DEBUG_SERVER; //Enable verbose debug output
$mail->isSMTP(); //Send using SMTP
$mail->Host = &#39;smtp.example.com&#39;; //Set the SMTP server to send through
$mail->SMTPAuth = true; //Enable SMTP authentication
$mail->Username = &#39;user@example.com&#39;; //SMTP username
$mail->Password = &#39;secret&#39;; //SMTP password
$mail->SMTPSecure = PHPMailer::ENCRYPTION_SMTPS; //Enable implicit TLS encryption
$mail->Port = 465; //TCP port to connect to; use 587 if you have set `SMTPSecure = PHPMailer::ENCRYPTION_STARTTLS`
//Recipients
$mail->setFrom(&#39;from@example.com&#39;, &#39;Mailer&#39;);
$mail->addAddress(&#39;joe@example.net&#39;, &#39;Joe User&#39;); //Add a recipient
$mail->addAddress(&#39;ellen@example.com&#39;); //Name is optional
$mail->addReplyTo(&#39;info@example.com&#39;, &#39;Information&#39;);
$mail->addCC(&#39;cc@example.com&#39;);
$mail->addBCC(&#39;bcc@example.com&#39;);
//Attachments
$mail->addAttachment(&#39;/var/tmp/file.tar.gz&#39;); //Add attachments
$mail->addAttachment(&#39;/tmp/image.jpg&#39;, &#39;new.jpg&#39;); //Optional name
//Content
$mail->isHTML(true); //Set email format to HTML
$mail->Subject = &#39;Here is the subject&#39;;
$mail->Body = &#39;This is the HTML message body <b>in bold!</b>&#39;;
$mail->AltBody = &#39;This is the body in plain text for non-HTML mail clients&#39;;
$mail->send();
echo &#39;Message has been sent&#39;;
} catch (Exception $e) {
echo &#34;Message could not be sent. Mailer Error: {$mail->ErrorInfo}&#34;;
}
3.2 个人使用及封装
以下为我个人的使用及封装建议
mail.php
<?php
/**
* 邮件发送
* @param $to 接收人
* @param string $subject 邮件标题
* @param string $content 邮件内容(html模板渲染后的内容)
* @throws Exception
* @throws phpmailerException
*/
// Import PHPMailer classes into the global namespace
// These must be at the top of your script, not inside a function
use PHPMailer\PHPMailer\PHPMailer;
use PHPMailer\PHPMailer\Exception;
use PHPMailer\PHPMailer\SMTP;
function send_email($to=&#34;&#34;,$subject=&#39;&#39;,$content=&#39;<h1>Hello World</h1>&#39;){
// 引入PHPMailer的核心文件
require_once(dirname(__FILE__).&#34;/phpmailer/PHPMailer.php&#34;); //这里的三个文件应填入你的PHPMailer放置目录
require_once(dirname(__FILE__).&#34;/phpmailer/Exception.php&#34;);
require_once(dirname(__FILE__).&#34;/phpmailer/SMTP.php&#34;);
$config = include &#39;config.php&#39;;
//初始化邮箱配置信息---在Config.php文件中进行配置
$mailUsername = $config[&#39;mailUsername&#39;]; //这里应
$mailPassword = $config[&#39;mailPassword&#39;];
$mailFromName = $config[&#39;mailFromName&#39;];
$mailHost = $config[&#39;mailHost&#39;];
$mailPort = $config[&#39;mailPort&#39;];
// 实例化PHPMailer核心类
$mail = new PHPMailer(true);
try {
// 是否启用smtp的debug进行调试 开发环境建议开启 生产环境注释掉即可 默认关闭debug调试模式
// 开启debug调试模式在报错时会给出更多错误信息,数值越高信息越详细
//Enable SMTP debugging
// 0 = off (for production use)
// 1 = client messages
// 2 = client and server messages
//$mail->SMTPDebug = 2;
//调试输出格式
//$mail->Debugoutput = &#39;html&#39;;
//客户端配置---Server settings
$mail->isSMTP(); // 使用smtp鉴权方式发送邮件
$mail->SMTPAuth = true; // smtp需要鉴权 这个必须是true
$mail->Host = $mailHost; // 链接邮箱的服务器地址
$mail->Username = $mailUsername; // smtp登录的账号,163邮箱与QQ邮箱均可
$mail->Password = $mailPassword; // smtp登录的密码,此处应邮箱账号开启SMTP服务生成的授权码
$mail->SMTPSecure = &#39;ssl&#39;; // 设置使用ssl加密方式登录鉴权
$mail->Port = $mailPort; // 设置ssl连接smtp服务器的远程服务器端口号
$mail->CharSet = &#39;UTF-8&#39;; // 设置发送的邮件的编码
//邮件账户设置---Recipients
$mail->setFrom($mailUsername, $mailFromName); // 设置发件人邮箱地址与昵称
$mail->addReplyTo($mailUsername, [&#39;Information&#39;]); // 设置回复时的用户与昵称,应与发件人相同
// 设置收件人邮箱地址
// $mail->addAddress(&#39;joe@example.net&#39;, [&#39;Joe User&#39;]); // 收件人配置示例,昵称配置可选
// 有多个收件人时添加多个收件人,效果等同于多个$mail->addAddress()
if(is_array($to))
{
foreach($to as $v)
{
$mail->addAddress($v);
}
}else{
$mail->addAddress($to);
}
//邮件内容---Content
$mail->isHTML(true); // 邮件正文是否为html编码
$mail->Subject = $subject; // 所要发送邮件的主题
// 添加邮件正文
// 这里我需要挨个发送多条消息,发送很多条邮件又很麻烦,索性就搞了一个数组
// 每条消息添加到数组中,最后以<br>换行符合成一个字符串
// 如果不是数组也无需改动
if(is_array($content))
{
$allcontent = implode(&#39;<br>&#39;, $content); // 将一维数组以<br>分隔组合成一个字符串
$mail->Body = $allcontent;
}else{
$mail->Body = $content;
}
//附加信息,可以省略
//$mail->AltBody = &#34;This is the body in plain text for non-HTML mail clients&#34;;
//附件
//$mail->addAttachment(&#39;./example.pdf&#39;); // 若需要发送附件就取消此条注释,将路径改为需要发送文件的路径。
// 发送邮件 返回状态
$mail->send();
echo &#39;<br>邮件发送成功!&#39;;
} catch (Exception $e) {
echo &#34;<br>Message could not be sent. Mailer Error: {$mail->ErrorInfo}&#34;;
}
}
?>
Config.php
<?php
/*
Copyright © 2022 by nxingcloud@163.com
*/
// 邮箱配置信息
// **********发件人配置************
$config[&#39;mailUsername&#39;] = &#39;********&#39;; //邮箱发件人账号
$config[&#39;mailPassword&#39;] = &#39;********&#39;; //邮箱发件人SMTP密码
$config[&#39;mailFromName&#39;] = &#39;********&#39;; //邮箱发件人昵称
$config[&#39;mailHost&#39;] = &#39;********&#39;; //邮箱服务器
$config[&#39;mailPort&#39;] = &#39;********&#39;; //邮箱端口号,以163为例,若不使用SSL加密方式则端口号为25,否则为465
// ***********发件内容及收件人配置******
$config[&#39;mailReceiver&#39;] = &#39;********&#39;; //收件人配置,可设置单个收件人,若需多个收件人则以数组[&#39;***&#39;, &#39;***&#39;]形式。
$config[&#39;mailSubject&#39;] = &#39;********&#39;; //所发邮件主题
$config[&#39;mailContent&#39;] = &#39;********&#39;; //所发邮件内容
return $config;
?>
3.3 使用方法
1、将PHPMailer的三个src文件放入项目目录,并在mail.php当中修改引入路径。
2、在config.php中填入所需相关配置。
3、将mail.php引入自己项目PHP文件中,使用sent_email()函数即可。
4、示例:
use.php
<?php
//引入配置文件
$config = include &#39;config.php&#39;;
// 引入邮箱类
include &#39;mail.php&#39;;
//初始化邮件发送信息及收件人
$mailReceiver = $config[&#39;mailReceiver&#39;];
$mailSubject = $config[&#39;mailSubject&#39;];
$mailContent = $config[&#39;mailContent&#39;];
send_email($to=$mailReceiver, $subject=$mailSubject, $content=$mailContent);
?>
四、结语
此文为个人做项目时的随手记录,苦恼于网络教程均不再适用,便写下此文展示最新的配置过程以供网友们查阅。
4.1 下载链接
本文全部源码的下载链接:https://pan.xenns.com/#s/8oFs6_6w
4.2 163及QQ邮箱配置参考
163邮箱
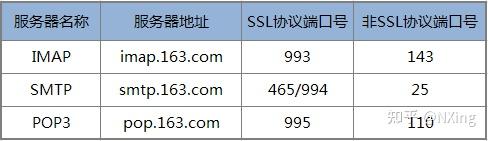
163邮箱配置
QQ邮箱
| 邮箱 | POP3服务器(端口995) | SMTP服务器(端口465或587) | | http://qq.com | http://pop.qq.com | http://smtp.qq.com |
4.3 参考链接
PHPMailer:https://github.com/PHPMailer/PHPMailer/
菜鸟教程:https://www.runoob.com/w3cnote/php-phpmailer.html |
|


 发表于 2022-11-5 13:30:32