|
|
LNMP一键安装包是什么?
LNMP一键安装包是一个用Linux Shell编写的可以为CentOS/RadHat/Fedora、Debian/Ubuntu/Raspbian/Deepin VPS或独立主机安装LNMP(Nginx/MySQL/PHP)、LNMPA(Nginx/MySQL/PHP/Apache)、LAMP(Apache/MySQL/PHP)生产环境的Shell程序。同时提供一些实用的辅助工具如:虚拟主机管理、FTP用户管理、Nginx、MySQL/MariaDB、PHP的升级、常用缓存组件Redis、Xcache等的安装、重置MySQL root密码、502自动重启、日志切割、SSH防护DenyHosts/Fail2Ban、备份等许多实用脚本。
都是复制过来的东西,下载地址和使用方法都在第一行的链接中,此处记录下来留存。 安装LNMP
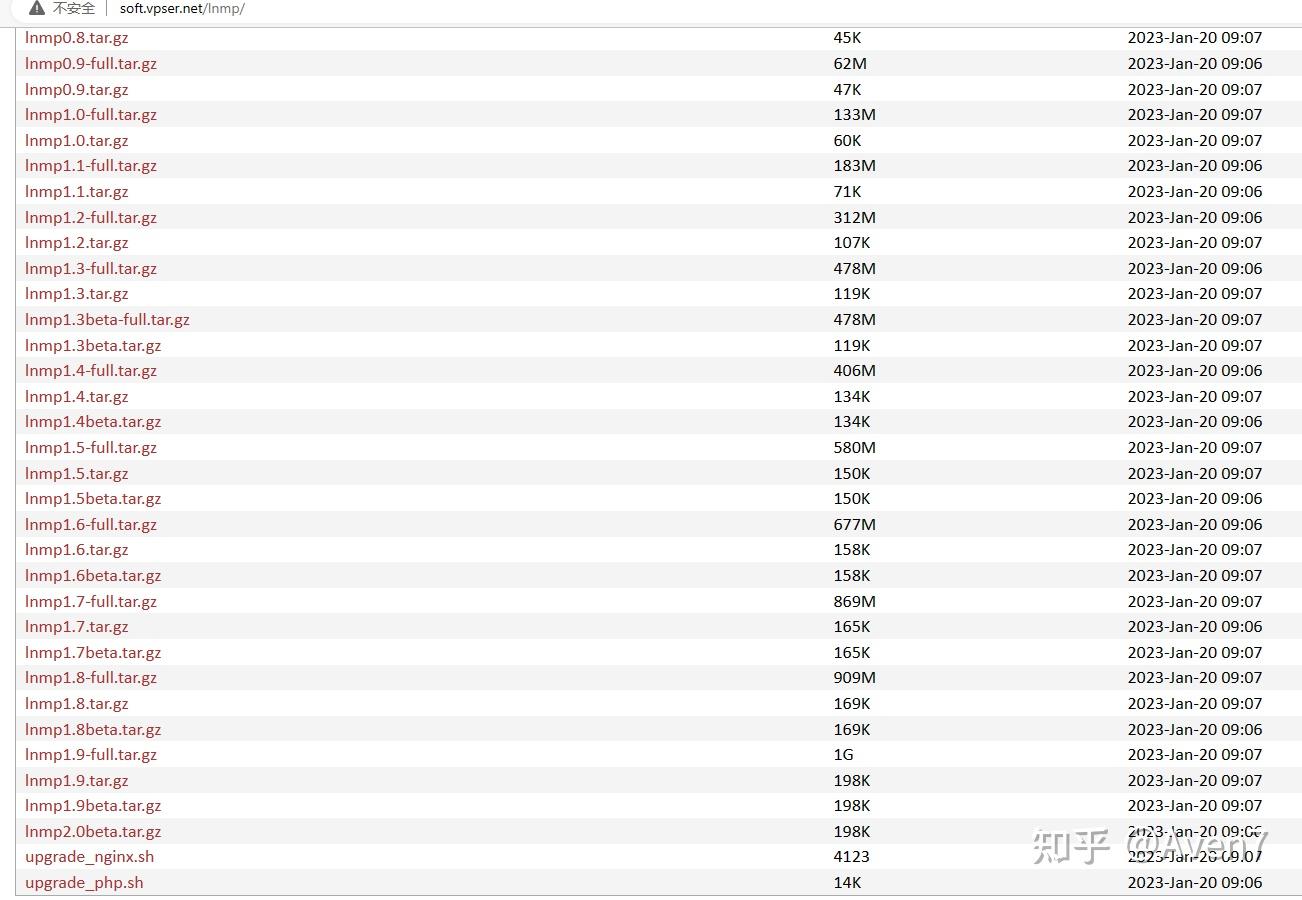
现在是1.9版本了,我把下载地址改成1.9,我安装时还是1.3。脚本正常使用,下载不了的网络问题,请自行解决。
wget -c http://soft.vpser.net/lnmp/lnmp1.9-full.tar.gz && tar zxf lnmp1.9-full.tar.gz && cd lnmp1.9-full && ./install.sh lnmp
按上述命令执行后,会出现如下提示:
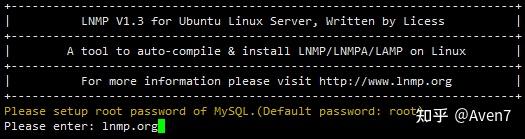
需要设置MySQL的root密码(不输入直接回车将会设置为root)如果输入有错误需要删除时,可以按住Ctrl再按Backspace键进行删除。输入后回车进入下一步,如下图所示:

询问是否需要启用MySQL InnoDB,InnoDB引擎默认为开启,一般建议开启,直接回车或输入 y ,如果确定确实不需要该引擎可以输入 n,输入完成,回车进入下一步 选择MySQL版本,目前提供了较多版本的MySQL和MariaDB,需要注意的是MySQL 5.6,5.7及MariaDB 10必须在1G以上内存的更高配置上才能选择:
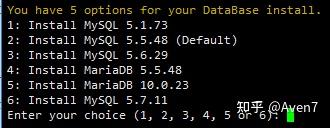
输入对应MySQL或MariaDB版本前面的序号,回车进入下一步,选择PHP版本: 注意:选择PHP7等高版本时需要自行确认是否与自己的程序兼容。
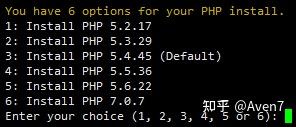
输入要选择的PHP版本的序号,回车进入下一步,选择是否安装内存优化:
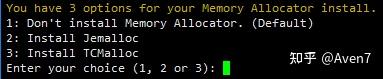
可以选择不安装、Jemalloc或TCmalloc,输入对应序号回车,直接回车为默认为不安装。
如果是LNMPA或LAMP的话还会提示“Please enter Administrator Email Address:”,需要设置管理员邮箱,该邮箱会在报错时显示在错误页面上。

再选择Apache版本
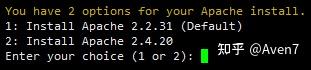
按提示输入对应版本前面的数字序号,回车。
提示”Press any key to install…or Press Ctrl+c to cancel”后,按回车键确认开始安装。 LNMP脚本就会自动安装编译Nginx、MySQL、PHP、phpMyAdmin、Zend Optimizer这几个软件。
安装时间可能会几十分钟到几个小时不等,主要是机器的配置网速等原因会造成影响。
如果显示Nginx: OK,MySQL: OK,PHP: OK
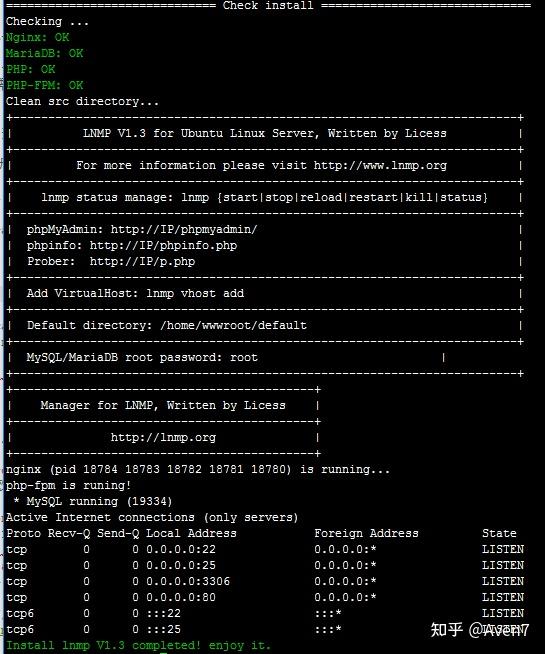
并且Nginx、MySQL、PHP都是running,80和3306端口都存在,并提示Install lnmp V1.3 completed! enjoy it.的话,说明已经安装成功。
添加虚拟主机参考:LNMP添加虚拟主机
[root@li1473-187 ~]# lnmp vhost add
+-------------------------------------------+
| Manager for LNMP, Written by Licess |
+-------------------------------------------+
| http://lnmp.org |
+-------------------------------------------+
Please enter domain(example: www.lnmp.org): test.kokwind.net
======================================
Your domain: test.kokwind.net
======================================
Do you want to add more domain name? (y/n) n
Please enter the directory for the domain: test.kokwind.net
(Default directory: /home/wwwroot/test.kokwind.net): testweb
Virtual Host Directory: testweb
===========================
Allow Rewrite rule? (y/n)
===========================
y
Please enter the rewrite of programme:
wordpress,discuz,typecho,sablog,dabr rewrite was exist.
(Default rewrite: other):wordpress
===========================
You choose rewrite=wordpress
===========================
===========================
Allow access_log? (y/n)
===========================
y
Enter access log name(Default access log file:test.kokwind.net.log): testweb
You access log filename: testweb.log
======================================================
Create database and MySQL user with same name (y/n)
======================================================
y
Enter current root password of Database (Password will not shown):
OK, MySQL root password correct.
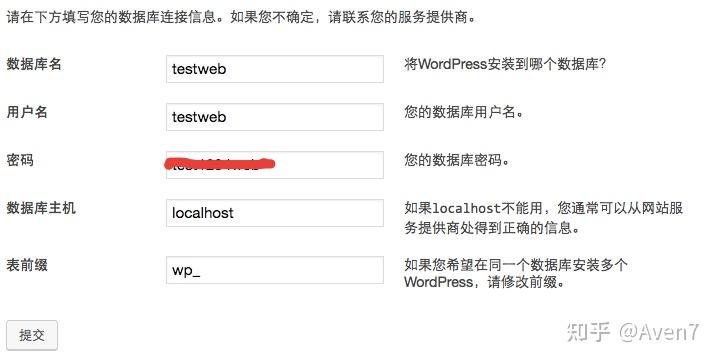
Enter database name: testweb
Your will create a database and MySQL user with same name: testweb
Please enter password for mysql user testweb: test1234web
Your password: xxxxxxxxx
Press any key to start create virtul host...
Create Virtul Host directory......
set permissions of Virtual Host directory......
You select the exist rewrite rule:/usr/local/nginx/conf/wordpress.conf
Gracefully shutting down php-fpm . done
Starting php-fpm done
Test Nginx configure file......
nginx: the configuration file /usr/local/nginx/conf/nginx.conf syntax is ok
nginx: configuration file /usr/local/nginx/conf/nginx.conf test is successful
Restart Nginx......
Add database Sucessfully.
================================================
Virtualhost infomation:
Your domain: test.kokwind.net
Home Directory: testweb
Rewrite: wordpress
Enable log: yes
Database username: testweb
Database userpassword: xxxxxxxxx
Database Name: testweb
Create ftp account: no
================================================
[root@li1473-187 ~]# lnmp vhost list
+-------------------------------------------+
| Manager for LNMP, Written by Licess |
+-------------------------------------------+
| http://lnmp.org |
+-------------------------------------------+
Nginx Virtualhost list:
test.kokwind.net
[root@li1473-187 ~]#下载wordpress并安装,参考链接
wget https://cn.wordpress.org/wordpress-4.7.2-zh_CN.tar.gzx
tar -xzvf wordpress-4.7.2-zh_CN.tar.gzx下载完成后查看与改成testweb
[root@li1473-187 wwwroot]# ls
default wordpress wordpress-4.7.2-zh_CN.tar.gz
[root@li1473-187 wwwroot]# mv wordpress testweb
[root@li1473-187 wwwroot]# ls
default testweb wordpress-4.7.2-zh_CN.tar.gz
[root@li1473-187 wwwroot]#配置DNS解析

LNMP默认网站配置文件:/usr/local/nginx/conf/nginx.conf
[root@li1473-187 ~]# cd /usr/local/nginx/conf
[root@li1473-187 conf]# ls
dabr.conf enable-php-pathinfo.conf mime.types sablog.conf vhost
dedecms.conf enable-ssl-example.conf mime.types.default scgi_params win-utf
discuz.conf fastcgi.conf nginx.conf scgi_params.default wordpress.conf
discuzx.conf fastcgi.conf.default nginx.conf.default shopex.conf wp2.conf
drupal.conf fastcgi_params none.conf typecho2.conf
ecshop.conf fastcgi_params.default pathinfo.conf typecho.conf
enable-php5.2.17.conf koi-utf phpwind.conf uwsgi_params
enable-php.conf koi-win proxy-pass-php.conf uwsgi_params.default
[root@li1473-187 conf]# cd vhost
[root@li1473-187 vhost]# ls
test.kokwind.net.conf
[root@li1473-187 vhost]# nano test.kokwind.net.conf
修改网站默认的路径
server
{
listen 80;
#listen [::]:80;
server_name test.kokwind.net;
index index.html index.htm index.php default.html default.htm default.php;
root /home/wwwroot/testweb;
include wordpress.conf;
#error_page 404 /404.html;
include enable-php.conf;
location ~ .*\.(gif|jpg|jpeg|png|bmp|swf)$
{重启nginx
[root@li1473-187 ~]# /etc/init.d/nginx reload
Reload service nginx... done
[root@li1473-187 ~]#修改文件权限,避免写入配置文件时没权限的问题。
[root@li1473-187 ~]# chown -R www /home/wwwroot/testweb/
[root@li1473-187 ~]# chmod -R 777 /home/wwwroot/testweb/打开浏览器输入网址后可以看到wordpress的安装页面了
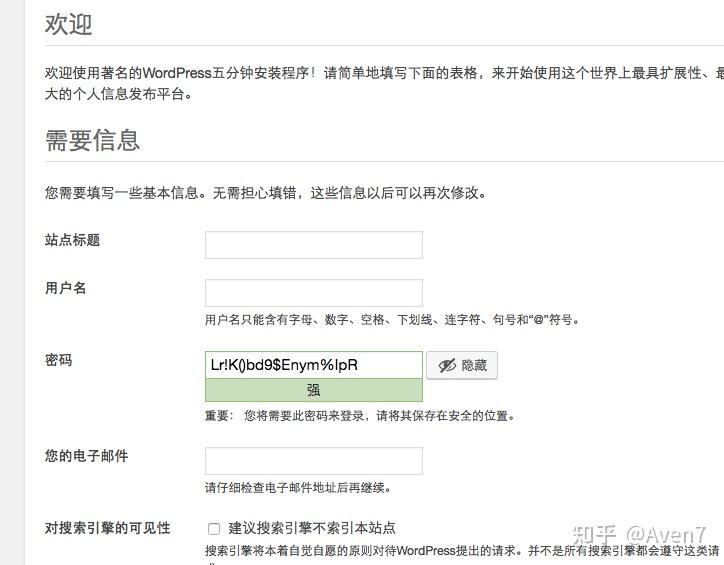
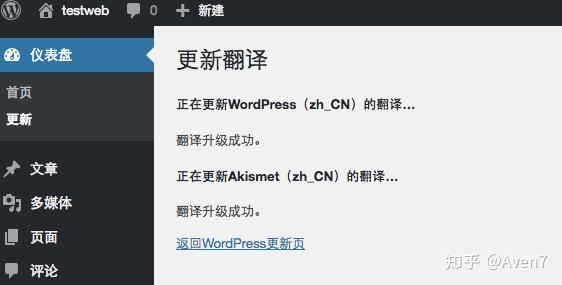
如果出现翻译需要更新,但是我们点击 “更新翻译” 后,刷新页面又出现的情况,如下图
[root@li1473-187 ~]# nano /usr/local/php/etc/php.ini
搜索scandir,删掉scandir字段,保存
GNU nano 2.0.9 File: /usr/local/php/etc/php.ini Modified
; http://php.net/open-basedir
;open_basedir =
; This directive allows you to disable certain functions for security reasons.
; It receives a comma-delimited list of function names. This directive is
; *NOT* affected by whether Safe Mode is turned On or Off.
; http://php.net/disable-functions
disable_functions = passthru,exec,system,chroot,scandir,chgrp,chown,shell_exec,proc_open,proc_get_status,popen,ini_alter,in$
; This directive allows you to disable certain classes for security reasons.
; It receives a comma-delimited list of class names. This directive is
; *NOT* affected by whether Safe Mode is turned On or Off.
; http://php.net/disable-classes
disable_classes =
^G Get Help ^O WriteOut ^R Read File ^Y Prev Page ^K Cut Text ^C Cur Pos
^X Exit ^J Justify ^W Where Is ^V Next Page ^U UnCut Text ^T To Spell
重启php,解决问题
[root@li1473-187 ~]# /etc/init.d/php-fpm restart
Gracefully shutting down php-fpm . done
Starting php-fpm done
[root@li1473-187 ~]#

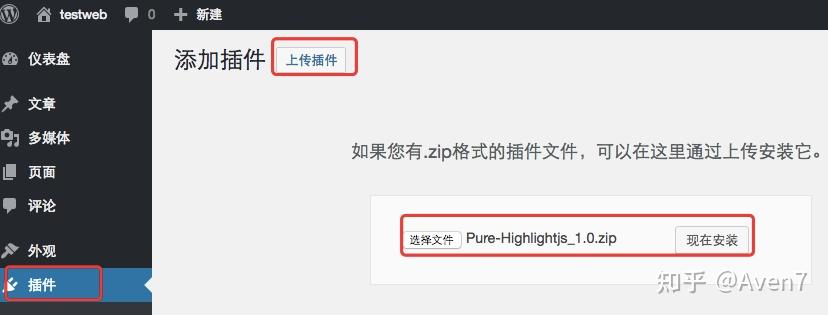
wordpress内嵌code高亮插件Pure-Highlightjs:下载
安装
进入 WordPress 后台管理页面,“插件 》安装插件 》上传插件”,上传刚才下载的 ZIP 文件,然后安装。或者解压安装包,上传到插件目录,/wp-content/plugins/。
启用
安装完毕后,在已经安装的插件里启用 “Pure Highlightjs”。可直接在可视化编辑界面点击“插入代码”按钮,然后选择代码类型,粘贴代码插入即可:
 |
|


 发表于 2023-3-3 00:46:39