|
|
在基本了解并在Kibana Dev Tools控制台操作Elasticsearch的查询语法之后,是时候在实际应用中使用ES了。那么怎么在Java中使用ES呢?
可以有下面几种方式来实现:
- Transport Client
- Java High Level REST Client
- Spring Data Elasticsearch
TransportClient 可用于老版本的Elasticsearch;新版本建议使用 Java High Level REST Client (向下兼容);当然还可以使用Spring Data提供的 Spring Data Elasticsearch 。
本文先只介绍一下 Transport Client API,后面慢慢来 REST Client 和 Spring Data Elasticsearch 。
Transport Client
注意:在7.0.0中弃用。不推荐使用TransportClient,而推荐使用Java High Level REST Client,并将在Elasticsearch 8.0中将其删除。
Elasticsearch 8.x版本将会删除 TransportClient 。这里为什么还要介绍一下它的API呢?毕竟有些老铁用的还是以前的版本,而且API很多地方是相通的,那就多学习一点吧!
引入jar包
<pre class=&#34;prettyprint hljs xml&#34; style=&#34;padding: 0.5em; font-family: Menlo, Monaco, Consolas, &quot;Courier New&quot;, monospace; color: rgb(68, 68, 68); border-radius: 4px; display: block; margin: 0px 0px 1.5em; font-size: 14px; line-height: 1.5em; word-break: break-all; overflow-wrap: break-word; white-space: pre; background-color: rgb(246, 246, 246); border: none; overflow-x: auto; font-style: normal; font-variant-ligatures: normal; font-variant-caps: normal; font-weight: 400; letter-spacing: normal; orphans: 2; text-align: start; text-indent: 0px; text-transform: none; widows: 2; word-spacing: 0px; -webkit-text-stroke-width: 0px; text-decoration-style: initial; text-decoration-color: initial;&#34;><dependency>
<groupId>org.elasticsearch.client</groupId>
<artifactId>transport</artifactId>
<version>7.9.0</version>
</dependency>注意版本号,一定要和你安装的Elasticsearch的版本号一致。
创建到ES的连接
必须得先连接到ES才能进行一系列的API测试,连接的代码如下:
<pre class=&#34;prettyprint hljs go&#34; style=&#34;padding: 0.5em; font-family: Menlo, Monaco, Consolas, &quot;Courier New&quot;, monospace; color: rgb(68, 68, 68); border-radius: 4px; display: block; margin: 0px 0px 1.5em; font-size: 14px; line-height: 1.5em; word-break: break-all; overflow-wrap: break-word; white-space: pre; background-color: rgb(246, 246, 246); border: none; overflow-x: auto; font-style: normal; font-variant-ligatures: normal; font-variant-caps: normal; font-weight: 400; letter-spacing: normal; orphans: 2; text-align: start; text-indent: 0px; text-transform: none; widows: 2; word-spacing: 0px; -webkit-text-stroke-width: 0px; text-decoration-style: initial; text-decoration-color: initial;&#34;>// 创建连接
TransportClient client = new PreBuiltTransportClient(Settings.EMPTY)
.addTransportAddress(
new TransportAddress(
InetAddress.getByName(&#34;localhost&#34;), 9300));
//一系列操作...
//关闭连接
client.close();

可以看到, TransportClient 是deprecated,弃用了,我用的是ES 7.9版本,它在7.0.0中被弃用。
注意:
- InetAddress.getByName(&#34;localhost&#34;), 9300) 这里绑定的端口 9300 是通讯端口,不是服务端口(服务端口是9200)
- 如果使用与 Elasticsearch 不同的集群名称,则必须设置集群名称:
<pre class=&#34;prettyprint hljs dockerfile&#34; style=&#34;padding: 0.5em; font-family: Menlo, Monaco, Consolas, &quot;Courier New&quot;, monospace; color: rgb(68, 68, 68); border-radius: 4px; display: block; margin: 0px 0px 1.5em; font-size: 14px; line-height: 1.5em; word-break: break-all; overflow-wrap: break-word; white-space: pre; background-color: rgb(246, 246, 246); border: none; overflow-x: auto; font-style: normal; font-variant-ligatures: normal; font-variant-caps: normal; font-weight: 400; letter-spacing: normal; orphans: 2; text-align: start; text-indent: 0px; text-transform: none; widows: 2; word-spacing: 0px; -webkit-text-stroke-width: 0px; text-decoration-style: initial; text-decoration-color: initial;&#34;>Settings settings = Settings.builder()
.put(&#34;cluster.name&#34;, &#34;myClusterName&#34;).build();
TransportClient client = new PreBuiltTransportClient(settings);
//Add transport addresses and do something with the client... 比如我的:
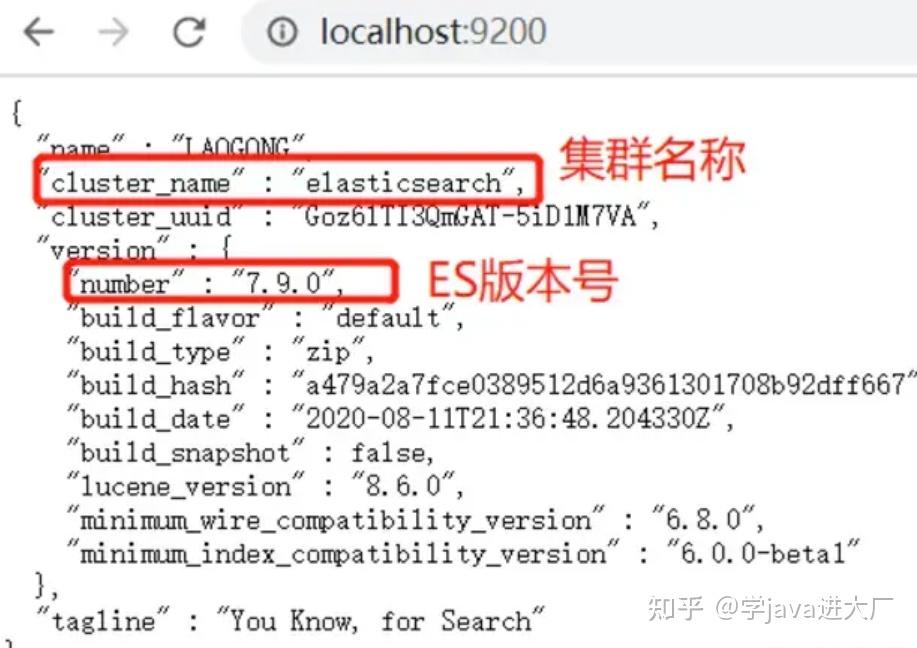
单节点ES默认的集群名称就是 elasticsearch 。
Index API
索引API允许将输入的JSON文档索引到特定索引中并使之可搜索。
生成JSON文档
生成JSON文档有很多种方法,比如:
<pre class=&#34;prettyprint hljs vbscript&#34; style=&#34;padding: 0.5em; font-family: Menlo, Monaco, Consolas, &quot;Courier New&quot;, monospace; color: rgb(68, 68, 68); border-radius: 4px; display: block; margin: 0px 0px 1.5em; font-size: 14px; line-height: 1.5em; word-break: break-all; overflow-wrap: break-word; white-space: pre; background-color: rgb(246, 246, 246); border: none; overflow-x: auto; font-style: normal; font-variant-ligatures: normal; font-variant-caps: normal; font-weight: 400; letter-spacing: normal; orphans: 2; text-align: start; text-indent: 0px; text-transform: none; widows: 2; word-spacing: 0px; -webkit-text-stroke-width: 0px; text-decoration-style: initial; text-decoration-color: initial;&#34;>String json = &#34;{&#34; +
&#34;\&#34;user\&#34;:\&#34;kimchy\&#34;,&#34; +
&#34;\&#34;postDate\&#34;:\&#34;2013-01-30\&#34;,&#34; +
&#34;\&#34;message\&#34;:\&#34;trying out Elasticsearch\&#34;&#34; +
&#34;}&#34;;
<pre class=&#34;prettyprint hljs javascript&#34; style=&#34;padding: 0.5em; font-family: Menlo, Monaco, Consolas, &quot;Courier New&quot;, monospace; color: rgb(68, 68, 68); border-radius: 4px; display: block; margin: 0px 0px 1.5em; font-size: 14px; line-height: 1.5em; word-break: break-all; overflow-wrap: break-word; white-space: pre; background-color: rgb(246, 246, 246); border: none; overflow-x: auto; font-style: normal; font-variant-ligatures: normal; font-variant-caps: normal; font-weight: 400; letter-spacing: normal; orphans: 2; text-align: start; text-indent: 0px; text-transform: none; widows: 2; word-spacing: 0px; -webkit-text-stroke-width: 0px; text-decoration-style: initial; text-decoration-color: initial;&#34;>Map<String, Object> json = new HashMap<String, Object>();
json.put(&#34;user&#34;,&#34;kimchy&#34;);
json.put(&#34;postDate&#34;,new Date());
json.put(&#34;message&#34;,&#34;trying out Elasticsearch&#34;);Map是一个key:values对集合。它可以表示一个JSON结构。
可以使用Jackson将bean序列化为JSON。
<pre class=&#34;prettyprint hljs verilog&#34; style=&#34;padding: 0.5em; font-family: Menlo, Monaco, Consolas, &quot;Courier New&quot;, monospace; color: rgb(68, 68, 68); border-radius: 4px; display: block; margin: 0px 0px 1.5em; font-size: 14px; line-height: 1.5em; word-break: break-all; overflow-wrap: break-word; white-space: pre; background-color: rgb(246, 246, 246); border: none; overflow-x: auto; font-style: normal; font-variant-ligatures: normal; font-variant-caps: normal; font-weight: 400; letter-spacing: normal; orphans: 2; text-align: start; text-indent: 0px; text-transform: none; widows: 2; word-spacing: 0px; -webkit-text-stroke-width: 0px; text-decoration-style: initial; text-decoration-color: initial;&#34;>import com.fasterxml.jackson.databind.*;
// instance a json mapper
ObjectMapper mapper = new ObjectMapper(); // create once, reuse
// generate json
byte[] json = mapper.writeValueAsBytes(yourbeaninstance);
com.alibaba.fastjson.JSONObject
它的转换方法,包括Java对象转成JSON串、JSON对象,JSON串转成java对象、JSON对象,JSON对象转换Java对象、JSON串等。
<pre class=&#34;prettyprint hljs xquery&#34; style=&#34;padding: 0.5em; font-family: Menlo, Monaco, Consolas, &quot;Courier New&quot;, monospace; color: rgb(68, 68, 68); border-radius: 4px; display: block; margin: 0px 0px 1.5em; font-size: 14px; line-height: 1.5em; word-break: break-all; overflow-wrap: break-word; white-space: pre; background-color: rgb(246, 246, 246); border: none; overflow-x: auto; font-style: normal; font-variant-ligatures: normal; font-variant-caps: normal; font-weight: 400; letter-spacing: normal; orphans: 2; text-align: start; text-indent: 0px; text-transform: none; widows: 2; word-spacing: 0px; -webkit-text-stroke-width: 0px; text-decoration-style: initial; text-decoration-color: initial;&#34;>String stuString = &#34;{\&#34;age\&#34;:2,\&#34;name\&#34;:\&#34;公众号行百里er\&#34;,\&#34;sex\&#34;:\&#34;m\&#34;}&#34;;
//JSON字符串转换成JSON对象
JSONObject jsonObject1 = JSONObject.parseObject(stuString);
当然,Elasticsearch 也提供了内置的帮助器以生成JSON内容:
<pre class=&#34;prettyprint hljs vbscript&#34; style=&#34;padding: 0.5em; font-family: Menlo, Monaco, Consolas, &quot;Courier New&quot;, monospace; color: rgb(68, 68, 68); border-radius: 4px; display: block; margin: 0px 0px 1.5em; font-size: 14px; line-height: 1.5em; word-break: break-all; overflow-wrap: break-word; white-space: pre; background-color: rgb(246, 246, 246); border: none; overflow-x: auto; font-style: normal; font-variant-ligatures: normal; font-variant-caps: normal; font-weight: 400; letter-spacing: normal; orphans: 2; text-align: start; text-indent: 0px; text-transform: none; widows: 2; word-spacing: 0px; -webkit-text-stroke-width: 0px; text-decoration-style: initial; text-decoration-color: initial;&#34;>XContentBuilder builder = jsonBuilder()
.startObject()
.field(&#34;user&#34;, &#34;kimchy&#34;)
.field(&#34;postDate&#34;, new Date())
.field(&#34;message&#34;, &#34;trying out Elasticsearch&#34;)
.endObject()增删改查API
Create 创建索引、文档相关API
向索引添加文档,如果索引不存在,则该API会自动给我们创建索引
<pre class=&#34;prettyprint hljs dart&#34; style=&#34;padding: 0.5em; font-family: Menlo, Monaco, Consolas, &quot;Courier New&quot;, monospace; color: rgb(68, 68, 68); border-radius: 4px; display: block; margin: 0px 0px 1.5em; font-size: 14px; line-height: 1.5em; word-break: break-all; overflow-wrap: break-word; white-space: pre; background-color: rgb(246, 246, 246); border: none; overflow-x: auto; font-style: normal; font-variant-ligatures: normal; font-variant-caps: normal; font-weight: 400; letter-spacing: normal; orphans: 2; text-align: start; text-indent: 0px; text-transform: none; widows: 2; word-spacing: 0px; -webkit-text-stroke-width: 0px; text-decoration-style: initial; text-decoration-color: initial;&#34;>@Test
@SneakyThrows
void esCRUD() {
// 创建连接
TransportClient client = new PreBuiltTransportClient(Settings.EMPTY)
.addTransportAddress(
new TransportAddress(
InetAddress.getByName(&#34;localhost&#34;), 9300));
//增
//create(client);
//查
//get(client);
//getAll(client);
//改
//update(client);
//删
delete(client);
}
@SneakyThrows
void create(TransportClient client){
for (int i = 0; i < 5; i++) {
XContentBuilder builder = XContentFactory.jsonBuilder()
.startObject()
.field(&#34;empName&#34;, &#34;name&#34; + i)
.field(&#34;age&#34;, new Random().nextInt(100))
.field(&#34;createTime&#34;, new Date())
.endObject();
IndexResponse response = client.prepareIndex(&#34;emp&#34;, &#34;_doc&#34;, String.valueOf(i))
.setSource(builder)
.get();
// //还可以不指定id
// IndexResponse response = client.prepareIndex(&#34;emp&#34;, &#34;_doc&#34;)
// .setSource(builder)
// .get();
System.out.println(response.getResult());
}
}这里我用prepareIndex指定id和不指定id分别执行了一遍,所以应该有10条文档产生。
通过Kibana控制台验证一下执行结果:
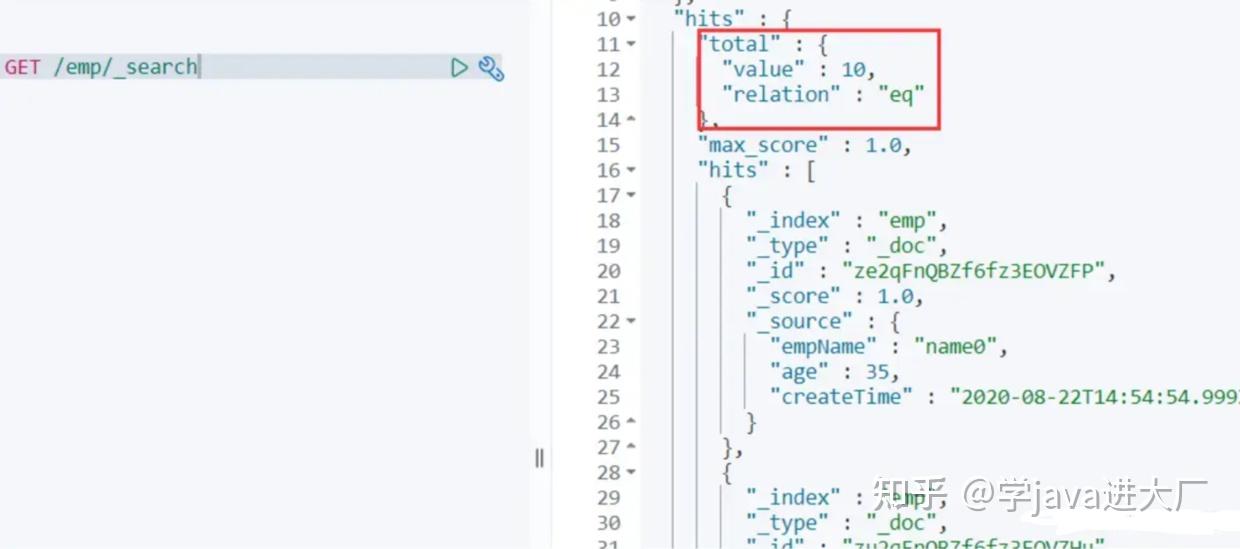
结果是执行成功的!
正好,用查询API来验证一下。
GET API 查询单个、所有文档相关API
代码生成的时候,又生成id为0~4的文档,就查一下id为3的吧先:
<pre class=&#34;prettyprint hljs typescript&#34; style=&#34;padding: 0.5em; font-family: Menlo, Monaco, Consolas, &quot;Courier New&quot;, monospace; color: rgb(68, 68, 68); border-radius: 4px; display: block; margin: 0px 0px 1.5em; font-size: 14px; line-height: 1.5em; word-break: break-all; overflow-wrap: break-word; white-space: pre; background-color: rgb(246, 246, 246); border: none; overflow-x: auto; font-style: normal; font-variant-ligatures: normal; font-variant-caps: normal; font-weight: 400; letter-spacing: normal; orphans: 2; text-align: start; text-indent: 0px; text-transform: none; widows: 2; word-spacing: 0px; -webkit-text-stroke-width: 0px; text-decoration-style: initial; text-decoration-color: initial;&#34;>private void get(TransportClient client) {
GetResponse response = client.prepareGet(&#34;emp&#34;, &#34;_doc&#34;, &#34;3&#34;).get();
String index = response.getIndex();//获取索引名称
String type = response.getType();//获取索引类型
String id = response.getId();//获取索引id
System.out.println(&#34;index:&#34; + index);
System.out.println(&#34;type:&#34; + type);
System.out.println(&#34;id:&#34; + id);
System.out.println(response.getSourceAsString());
}
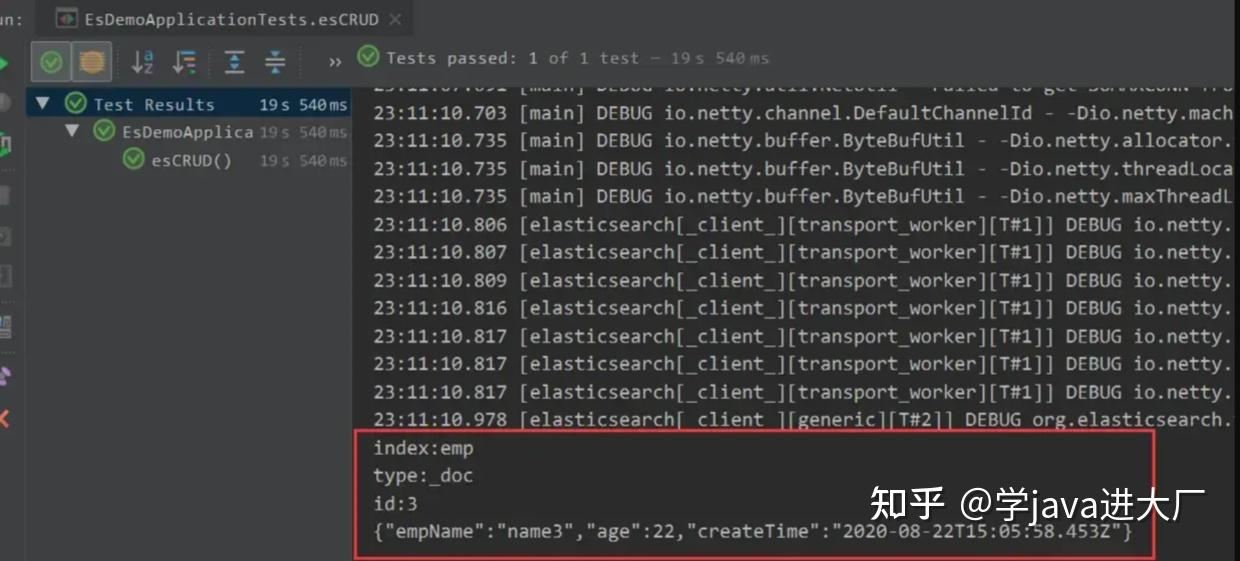
执行成功!
查询所有的API试一下:
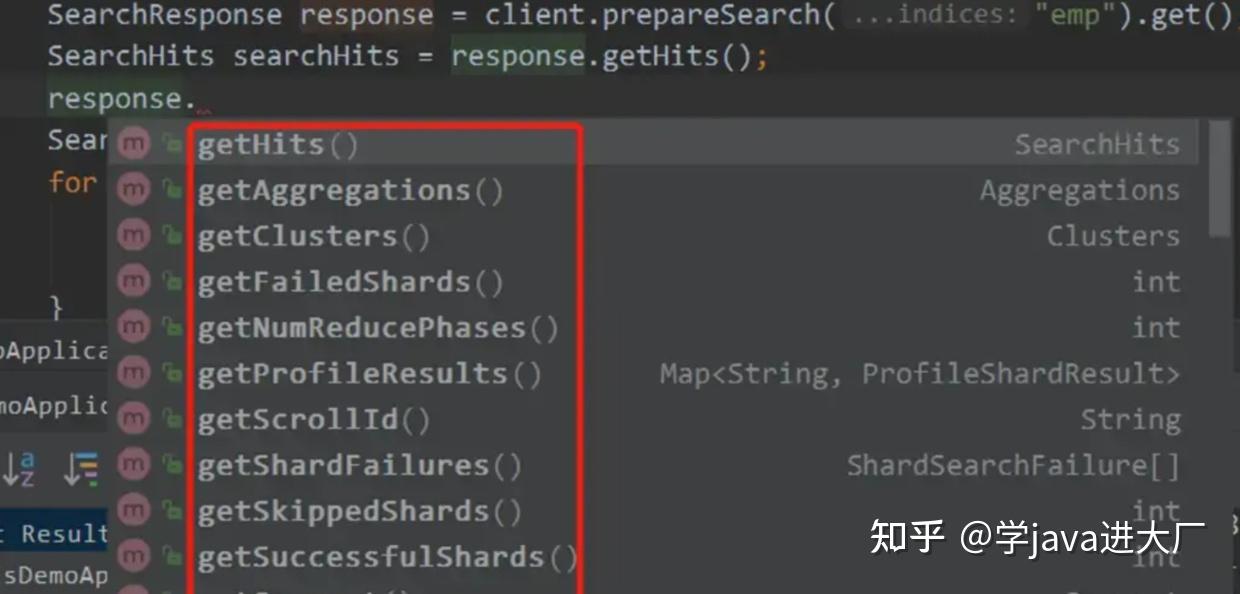
<pre class=&#34;prettyprint hljs vbscript&#34; style=&#34;padding: 0.5em; font-family: Menlo, Monaco, Consolas, &quot;Courier New&quot;, monospace; color: rgb(68, 68, 68); border-radius: 4px; display: block; margin: 0px 0px 1.5em; font-size: 14px; line-height: 1.5em; word-break: break-all; overflow-wrap: break-word; white-space: pre; background-color: rgb(246, 246, 246); border: none; overflow-x: auto; font-style: normal; font-variant-ligatures: normal; font-variant-caps: normal; font-weight: 400; letter-spacing: normal; orphans: 2; text-align: start; text-indent: 0px; text-transform: none; widows: 2; word-spacing: 0px; -webkit-text-stroke-width: 0px; text-decoration-style: initial; text-decoration-color: initial;&#34;>private void getAll(TransportClient client) {
SearchResponse response = client.prepareSearch(&#34;emp&#34;).get();
SearchHits searchHits = response.getHits();
SearchHit[] hits = searchHits.getHits();
for (SearchHit hit : hits) {
String res = hit.getSourceAsString();
System.out.println(&#34;res&#34; + res);
}
}
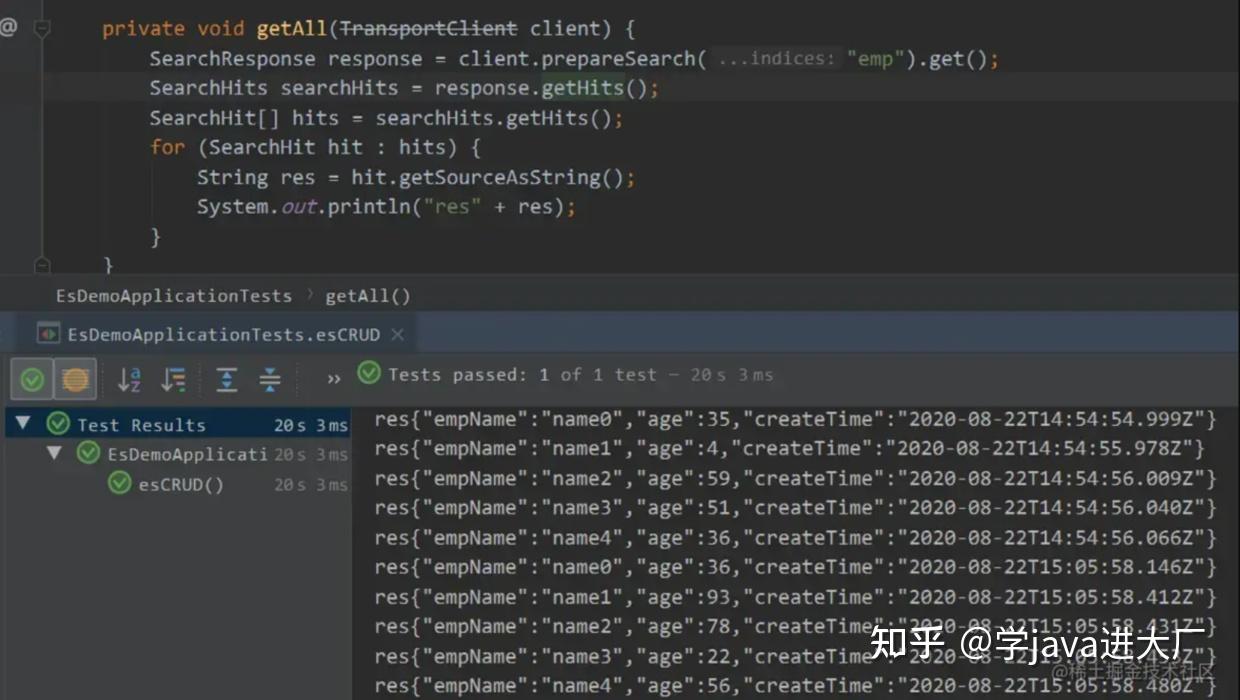
OK,成功查询出所有文档。
这里可以对比Kibana Dev Tools控制台返回的json结果,
<pre class=&#34;prettyprint hljs xquery&#34; style=&#34;padding: 0.5em; font-family: Menlo, Monaco, Consolas, &quot;Courier New&quot;, monospace; color: rgb(68, 68, 68); border-radius: 4px; display: block; margin: 0px 0px 1.5em; font-size: 14px; line-height: 1.5em; word-break: break-all; overflow-wrap: break-word; white-space: pre; background-color: rgb(246, 246, 246); border: none; overflow-x: auto; font-style: normal; font-variant-ligatures: normal; font-variant-caps: normal; font-weight: 400; letter-spacing: normal; orphans: 2; text-align: start; text-indent: 0px; text-transform: none; widows: 2; word-spacing: 0px; -webkit-text-stroke-width: 0px; text-decoration-style: initial; text-decoration-color: initial;&#34;>{
&#34;took&#34; : 134,
&#34;timed_out&#34; : false,
&#34;_shards&#34; : {
&#34;total&#34; : 1,
&#34;successful&#34; : 1,
&#34;skipped&#34; : 0,
&#34;failed&#34; : 0
},
&#34;hits&#34; : {
&#34;total&#34; : {
&#34;value&#34; : 10,
&#34;relation&#34; : &#34;eq&#34;
},
&#34;max_score&#34; : 1.0,
&#34;hits&#34; : [
{
&#34;_index&#34; : &#34;emp&#34;,
&#34;_type&#34; : &#34;_doc&#34;,
&#34;_id&#34; : &#34;ze2qFnQBZf6fz3EOVZFP&#34;,
&#34;_score&#34; : 1.0,
&#34;_source&#34; : {
&#34;empName&#34; : &#34;name0&#34;,
&#34;age&#34; : 35,
&#34;createTime&#34; : &#34;2020-08-22T14:54:54.999Z&#34;
}
},
// 中间的结果略...
{
&#34;_index&#34; : &#34;emp&#34;,
&#34;_type&#34; : &#34;_doc&#34;,
&#34;_id&#34; : &#34;4&#34;,
&#34;_score&#34; : 1.0,
&#34;_source&#34; : {
&#34;empName&#34; : &#34;name4&#34;,
&#34;age&#34; : 56,
&#34;createTime&#34; : &#34;2020-08-22T15:05:58.480Z&#34;
}
}
]
}
}
Java API的一些方法名和ES查询结果JSON先关字段一般能对的上,如果平时控制台操作比较熟悉的话,再来使用API其实很简单了!
Update API
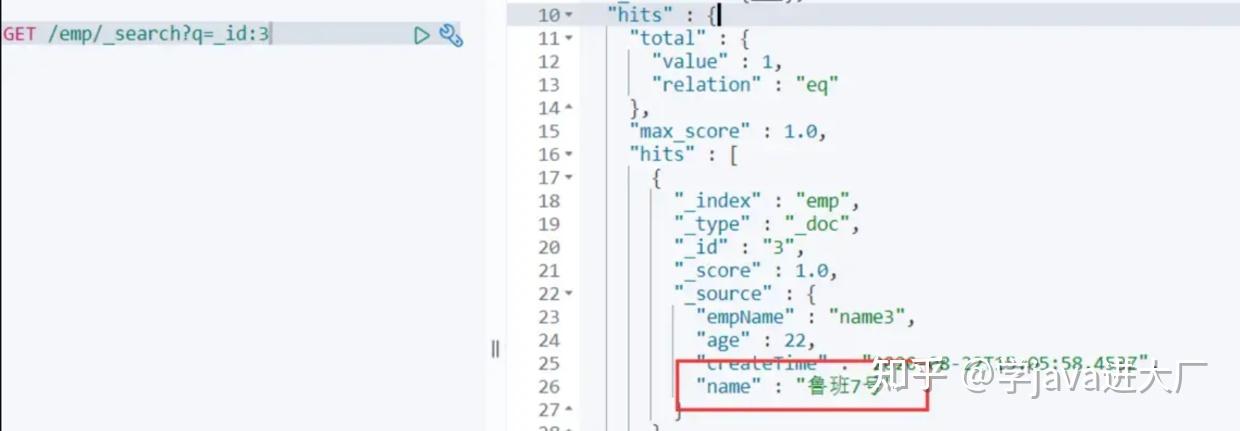
修改id为3的记录,将其name改为鲁班7号:
<pre class=&#34;prettyprint hljs cs&#34; style=&#34;padding: 0.5em; font-family: Menlo, Monaco, Consolas, &quot;Courier New&quot;, monospace; color: rgb(68, 68, 68); border-radius: 4px; display: block; margin: 0px 0px 1.5em; font-size: 14px; line-height: 1.5em; word-break: break-all; overflow-wrap: break-word; white-space: pre; background-color: rgb(246, 246, 246); border: none; overflow-x: auto; font-style: normal; font-variant-ligatures: normal; font-variant-caps: normal; font-weight: 400; letter-spacing: normal; orphans: 2; text-align: start; text-indent: 0px; text-transform: none; widows: 2; word-spacing: 0px; -webkit-text-stroke-width: 0px; text-decoration-style: initial; text-decoration-color: initial;&#34;>private void update(TransportClient client) {
try {
UpdateResponse response = client.prepareUpdate(&#34;emp&#34;, &#34;_doc&#34;, &#34;3&#34;)
.setDoc(XContentFactory.jsonBuilder()
.startObject()
.field(&#34;name&#34;, &#34;鲁班7号&#34;)
.endObject())
.get();
System.out.println(response.getResult());
} catch (IOException e) {
e.printStackTrace();
}
}验证一下:
Delete API
删除id为3的文档记录:
<pre class=&#34;prettyprint hljs cs&#34; style=&#34;padding: 0.5em; font-family: Menlo, Monaco, Consolas, &quot;Courier New&quot;, monospace; color: rgb(68, 68, 68); border-radius: 4px; display: block; margin: 0px 0px 1.5em; font-size: 14px; line-height: 1.5em; word-break: break-all; overflow-wrap: break-word; white-space: pre; background-color: rgb(246, 246, 246); border: none; overflow-x: auto; font-style: normal; font-variant-ligatures: normal; font-variant-caps: normal; font-weight: 400; letter-spacing: normal; orphans: 2; text-align: start; text-indent: 0px; text-transform: none; widows: 2; word-spacing: 0px; -webkit-text-stroke-width: 0px; text-decoration-style: initial; text-decoration-color: initial;&#34;>private void delete(TransportClient client) {
DeleteResponse response = client.prepareDelete(&#34;emp&#34;, &#34;_doc&#34;, &#34;3&#34;).get();
System.out.println(response.getResult());
} |
|


 发表于 2023-6-2 16:19:47